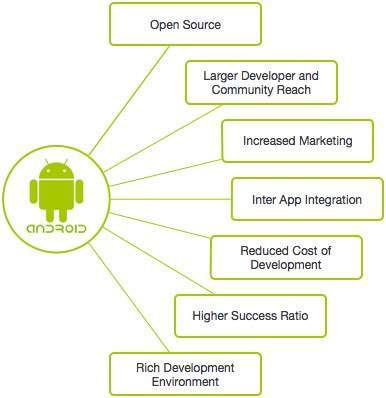
Why Android ?
Android is an open source and Linux-based operating system for mobile devices such as smartphones and tablet computers. Android was developed by the Open Handset Alliance, led by Google, and other companies. This tutorial will teach you basic Android programming and will also take you through some advance concepts related to Android application development.
| Platform Version | API Level | VERSION_CODE | |
|---|---|---|---|
| Android 6.0 | 23 | MARSHMALLOW | |
| Android 5.1 | 22 | LOLLIPOP_MR1 | |
| Android 5.0 | 21 | LOLLIPOP | |
| Android 4.4W | 20 | KITKAT_WATCH | KitKat for Wearables Only |
| Android 4.4 | 19 | KITKAT | |
| Android 4.3 | 18 | JELLY_BEAN_MR2 | |
| Android 4.2, 4.2.2 | 17 | JELLY_BEAN_MR1 | |
| Android 4.1, 4.1.1 | 16 | JELLY_BEAN | |
| Android 4.0.3, 4.0.4 | 15 | ICE_CREAM_SANDWICH_MR1 | |
| Android 4.0, 4.0.1, 4.0.2 | 14 | ICE_CREAM_SANDWICH | |
| Android 3.2 | 13 | HONEYCOMB_MR2 | |
| Android 3.1.x | 12 | HONEYCOMB_MR1 | |
| Android 3.0.x | 11 | HONEYCOMB | |
Android 2.3.4
Android 2.3.3
| 10 | GINGERBREAD_MR1 | |
Android 2.3.2
Android 2.3.1
Android 2.3
| 9 | GINGERBREAD | |
| Android 2.2.x | 8 | FROYO | |
| Android 2.1.x | 7 | ECLAIR_MR1 | |
| Android 2.0.1 | 6 | ECLAIR_0_1 | |
| Android 2.0 | 5 | ECLAIR | |
| Android 1.6 | 4 | DONUT | |
| Android 1.5 | 3 | CUPCAKE | |
| Android 1.1 | 2 | BASE_1_1 | |
| Android 1.0 | 1 | BASE |
Software Required
You will be glad to know that you can start your Android application development on either of the following operating systems −
- Microsoft Windows XP or later version.
- Mac OS X 10.5.8 or later version with Intel chip.
- Linux including GNU C Library 2.7 or later.
Second point is that all the required tools to develop Android applications are freely available and can be downloaded from the Web. Following is the list of software's you will need before you start your Android application programming.
- Java JDK5 or later version
- Android Studio
Here last two components are optional and if you are working on Windows machine then these components make your life easy while doing Java based application development. So let us have a look how to proceed to set required environment.
Set-up Java Development Kit (JDK)
You can download the latest version of Java JDK from Oracle's Java site − Java SE Downloads. You will find instructions for installing JDK in downloaded files, follow the given instructions to install and configure the setup. Finally set PATH and JAVA_HOME environment variables to refer to the directory that contains java and javac, typically java_install_dir/bin and java_install_dir respectively.
If you are running Windows and installed the JDK in C:\jdk1.8.0_102, you would have to put the following line in your C:\autoexec.bat file.
set PATH=C:\jdk1.8.0_102\bin;%PATH%
set JAVA_HOME=C:\jdk1.8.0_102
Alternatively, you could also right-click on My Computer, select Properties, then Advanced, then Environment Variables. Then, you would update the PATH value and press the OK button.
On Linux, if the SDK is installed in /usr/local/jdk1.8.0_102 and you use the C shell, you would put the following code into your .cshrc file.
setenv PATH /usr/local/jdk1.8.0_102/bin:$PATH
setenv JAVA_HOME /usr/local/jdk1.8.0_102
Alternatively, if you use Android studio, then it will know automatically where you have installed your Java.
Android IDEs
There are so many sophisticated Technologies are available to develop android applications, the familiar technologies, which are predominantly using tools as follows
- Eclipse IDE(Deprecated)
Android operating system is a stack of software components which is roughly divided into five sections and four main layers as shown below in the architecture diagram.
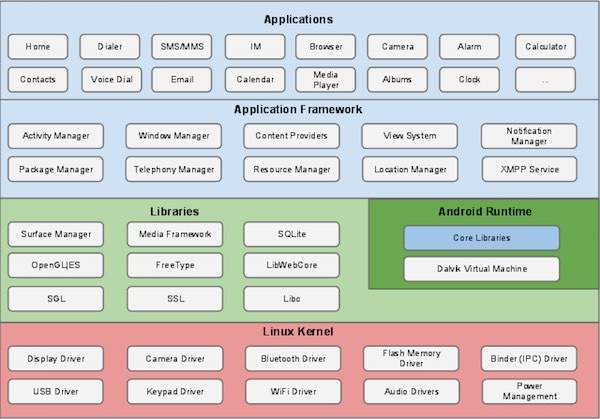
Linux kernel
At the bottom of the layers is Linux - Linux 3.6 with approximately 115 patches. This provides a level of abstraction between the device hardware and it contains all the essential hardware drivers like camera, keypad, display etc. Also, the kernel handles all the things that Linux is really good at such as networking and a vast array of device drivers, which take the pain out of interfacing to peripheral hardware.
Libraries
On top of Linux kernel there is a set of libraries including open-source Web browser engine WebKit, well known library libc, SQLite database which is a useful repository for storage and sharing of application data, libraries to play and record audio and video, SSL libraries responsible for Internet security etc.
Android Libraries
This category encompasses those Java-based libraries that are specific to Android development. Examples of libraries in this category include the application framework libraries in addition to those that facilitate user interface building, graphics drawing and database access. A summary of some key core Android libraries available to the Android developer is as follows −
- android.app − Provides access to the application model and is the cornerstone of all Android applications.
- android.content − Facilitates content access, publishing and messaging between applications and application components.
- android.database − Used to access data published by content providers and includes SQLite database management classes.
- android.opengl − A Java interface to the OpenGL ES 3D graphics rendering API.
- android.os − Provides applications with access to standard operating system services including messages, system services and inter-process communication.
- android.text − Used to render and manipulate text on a device display.
- android.view − The fundamental building blocks of application user interfaces.
- android.widget − A rich collection of pre-built user interface components such as buttons, labels, list views, layout managers, radio buttons etc.
- android.webkit − A set of classes intended to allow web-browsing capabilities to be built into applications.
Having covered the Java-based core libraries in the Android runtime, it is now time to turn our attention to the C/C++ based libraries contained in this layer of the Android software stack.
Android Runtime
This is the third section of the architecture and available on the second layer from the bottom. This section provides a key component called Dalvik Virtual Machine which is a kind of Java Virtual Machine specially designed and optimized for Android.
The Dalvik VM makes use of Linux core features like memory management and multi-threading, which is intrinsic in the Java language. The Dalvik VM enables every Android application to run in its own process, with its own instance of the Dalvik virtual machine.
The Android runtime also provides a set of core libraries which enable Android application developers to write Android applications using standard Java programming language.
Application Framework
The Application Framework layer provides many higher-level services to applications in the form of Java classes. Application developers are allowed to make use of these services in their applications.
The Android framework includes the following key services −
- Activity Manager − Controls all aspects of the application lifecycle and activity stack.
- Content Providers − Allows applications to publish and share data with other applications.
- Resource Manager − Provides access to non-code embedded resources such as strings, color settings and user interface layouts.
- Notifications Manager − Allows applications to display alerts and notifications to the user.
- View System − An extensible set of views used to create application user interfaces.
Applications
You will find all the Android application at the top layer. You will write your application to be installed on this layer only. Examples of such applications are Contacts Books, Browser, Games etc.
Application components are the essential building blocks of an Android application. These components are loosely coupled by the application manifest file AndroidManifest.xml that describes each component of the application and how they interact.
There are following four main components that can be used within an Android application −
| Sr.No | Components & Description |
|---|---|
| 1 |
Activities
They dictate the UI and handle the user interaction to the smart phone screen.
|
| 2 |
Services
They handle background processing associated with an application.
|
| 3 |
Broadcast Receivers
They handle communication between Android OS and applications.
|
| 4 |
Content Providers
They handle data and database management issues.
|
Activities
An activity represents a single screen with a user interface,in-short Activity performs actions on the screen. For example, an email application might have one activity that shows a list of new emails, another activity to compose an email, and another activity for reading emails. If an application has more than one activity, then one of them should be marked as the activity that is presented when the application is launched.
An activity is implemented as a subclass of Activity class as follows −
public class MainActivity extends Activity {
}
Services
A service is a component that runs in the background to perform long-running operations. For example, a service might play music in the background while the user is in a different application, or it might fetch data over the network without blocking user interaction with an activity.
A service is implemented as a subclass of Service class as follows −
public class MyService extends Service {
}
Broadcast Receivers
Broadcast Receivers simply respond to broadcast messages from other applications or from the system. For example, applications can also initiate broadcasts to let other applications know that some data has been downloaded to the device and is available for them to use, so this is broadcast receiver who will intercept this communication and will initiate appropriate action.
A broadcast receiver is implemented as a subclass of BroadcastReceiverclass and each message is broadcaster as an Intent object.
public class MyReceiver  extends  BroadcastReceiver {
   public void onReceive(context,intent){}
}
Content Providers
A content provider component supplies data from one application to others on request. Such requests are handled by the methods of the ContentResolverclass. The data may be stored in the file system, the database or somewhere else entirely.
A content provider is implemented as a subclass of ContentProvider class and must implement a standard set of APIs that enable other applications to perform transactions.
public class MyContentProvider extends  ContentProvider {
   public void onCreate(){}
}
We will go through these tags in detail while covering application components in individual chapters.
Additional Components
There are additional components which will be used in the construction of above mentioned entities, their logic, and wiring between them. These components are −
| S.No | Components & Description |
|---|---|
| 1 |
Fragments
Represents a portion of user interface in an Activity.
|
| 2 |
Views
UI elements that are drawn on-screen including buttons, lists forms etc.
|
| 3 |
Layouts
View hierarchies that control screen format and appearance of the views.
|
| 4 |
Intents
Messages wiring components together.
|
| 5 |
Resources
External elements, such as strings, constants and drawable pictures.
|
| 6 |
Manifest
Configuration file for the application.
|
Let us start actual programming with Android Framework. Before you start writing your first example using Android SDK, you have to make sure that you have set-up your Android development environment properly as explained in Android - Environment Set-up tutorial. I also assume that you have a little bit working knowledge with Android studio.
So let us proceed to write a simple Android Application which will print "Hello World!".
Create Android Application
The first step is to create a simple Android Application using Android studio. When you click on Android studio icon, it will show screen as shown below
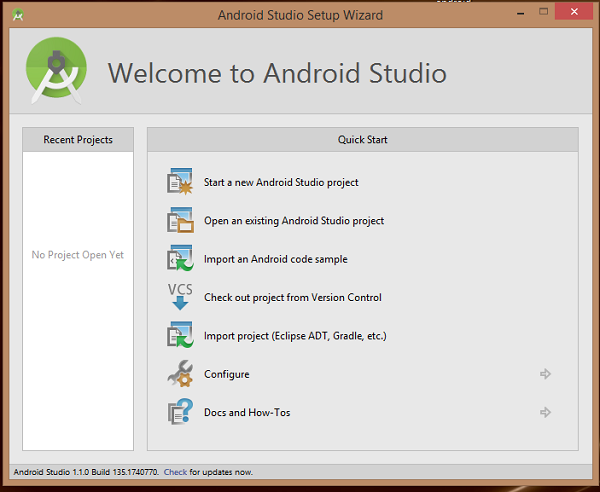
You can start your application development by calling start a new android studio project. in a new installation frame should ask Application name, package information and location of the project.−
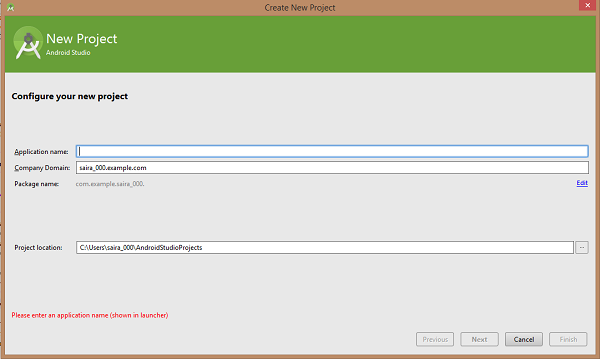
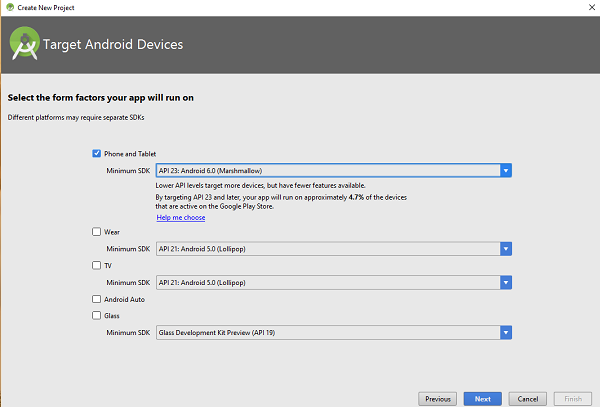
After entered application name, it going to be called select the form factors your application runs on, here need to specify Minimum SDK, in our tutorial, I have declared as API23: Android 6.0(Mashmallow) −
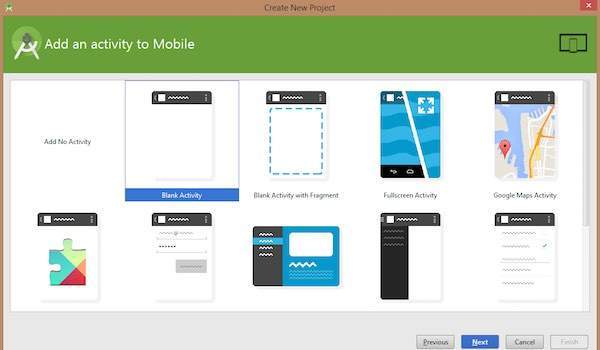
The next level of installation should contain selecting the activity to mobile, it specifies the default layout for Applications.
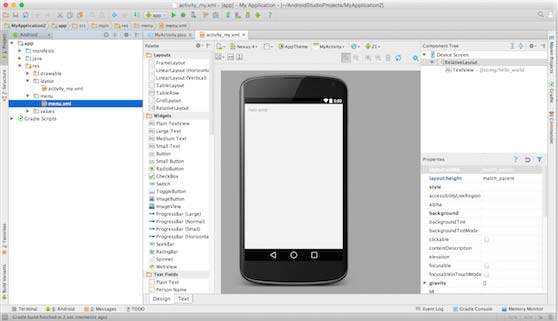
At the final stage it going to be open development tool to write the application code.
Anatomy of Android Application
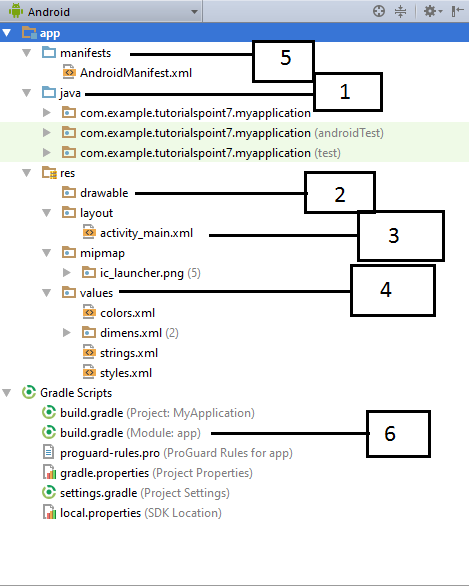
Before you run your app, you should be aware of a few directories and files in the Android project −
| Sr.No. | Folder, File & Description |
|---|---|
| 1 |
Java
This contains the .java source files for your project. By default, it includes an MainActivity.java source file having an activity class that runs when your app is launched using the app icon.
|
| 2 |
res/drawable-hdpi
This is a directory for drawable objects that are designed for high-density screens.
|
| 3 |
res/layout
This is a directory for files that define your app's user interface.
|
| 4 |
res/values
This is a directory for other various XML files that contain a collection of resources, such as strings and colours definitions.
|
| 5 |
AndroidManifest.xml
This is the manifest file which describes the fundamental characteristics of the app and defines each of its components.
|
| 6 |
Build.gradle
This is an auto generated file which contains compileSdkVersion, buildToolsVersion, applicationId, minSdkVersion, targetSdkVersion, versionCode and versionName
|
Following section will give a brief overview of the important application files.
The Main Activity File
The main activity code is a Java file MainActivity.java. This is the actual application file which ultimately gets converted to a Dalvik executable and runs your application. Following is the default code generated by the application wizard for Hello World! application −
package com.example.helloworld;

import android.support.v7.app.AppCompatActivity;
import android.os.Bundle;

public class MainActivity extends AppCompatActivity {
   @Override
   protected void onCreate(Bundle savedInstanceState) {
      super.onCreate(savedInstanceState);
      setContentView(R.layout.activity_main);
   }
}
Here, R.layout.activity_main refers to the activity_main.xml file located in the res/layout folder. The onCreate() method is one of many methods that are figured when an activity is loaded.
The Manifest File
Whatever component you develop as a part of your application, you must declare all its components in a manifest.xml which resides at the root of the application project directory. This file works as an interface between Android OS and your application, so if you do not declare your component in this file, then it will not be considered by the OS. For example, a default manifest file will look like as following file −
<?xml version="1.0" encoding="utf-8"?>
<manifest xmlns:android="http://schemas.android.com/apk/res/android"
    package="com.example.tutorialspoint7.myapplication">

   <application
      android:allowBackup="true"
      android:icon="@mipmap/ic_launcher"
      android:label="@string/app_name"
      android:supportsRtl="true"
      android:theme="@style/AppTheme">

      <activity android:name=".MainActivity">
         <intent-filter>
            <action android:name="android.intent.action.MAIN" />
            <category android:name="android.intent.category.LAUNCHER" />
         </intent-filter>
      </activity>
   </application>
</manifest>
Here <application>...</application> tags enclosed the components related to the application. Attribute android:icon will point to the application icon available under res/drawable-hdpi. The application uses the image named ic_launcher.png located in the drawable folders
The <activity> tag is used to specify an activity and android:name attribute specifies the fully qualified class name of the Activity subclass and the android:label attributes specifies a string to use as the label for the activity. You can specify multiple activities using <activity> tags.
The action for the intent filter is named android.intent.action.MAIN to indicate that this activity serves as the entry point for the application. The categoryfor the intent-filter is named android.intent.category.LAUNCHER to indicate that the application can be launched from the device's launcher icon.
The @string refers to the strings.xml file explained below. Hence, @string/app_name refers to the app_name string defined in the strings.xml file, which is "HelloWorld". Similar way, other strings get populated in the application.
Following is the list of tags which you will use in your manifest file to specify different Android application components −
- <activity>elements for activities
- <service> elements for services
- <receiver> elements for broadcast receivers
- <provider> elements for content providers
The Strings File
The strings.xml file is located in the res/values folder and it contains all the text that your application uses. For example, the names of buttons, labels, default text, and similar types of strings go into this file. This file is responsible for their textual content. For example, a default strings file will look like as following file −
<resources>
   <string name="app_name">HelloWorld</string>
   <string name="hello_world">Hello world!</string>
   <string name="menu_settings">Settings</string>
   <string name="title_activity_main">MainActivity</string>
</resources>
The Layout File
The activity_main.xml is a layout file available in res/layout directory, that is referenced by your application when building its interface. You will modify this file very frequently to change the layout of your application. For your "Hello World!" application, this file will have following content related to default layout −
<RelativeLayout xmlns:android="http://schemas.android.com/apk/res/android"
   xmlns:tools="http://schemas.android.com/tools"
   android:layout_width="match_parent"
   android:layout_height="match_parent" >

   <TextView
      android:layout_width="wrap_content"
      android:layout_height="wrap_content"
      android:layout_centerHorizontal="true"
      android:layout_centerVertical="true"
      android:padding="@dimen/padding_medium"
      android:text="@string/hello_world"
      tools:context=".MainActivity" />

</RelativeLayout>
This is an example of simple RelativeLayout which we will study in a separate chapter. The TextView is an Android control used to build the GUI and it have various attributes like android:layout_width, android:layout_height etc which are being used to set its width and height etc.. The @string refers to the strings.xml file located in the res/values folder. Hence, @string/hello_world refers to the hello string defined in the strings.xml file, which is "Hello World!".
Running the Application
Let's try to run our Hello World! application we just created. I assume you had created your AVD while doing environment set-up. To run the app from Android studio, open one of your project's activity files and click Run  icon from the tool bar. Android studio installs the app on your AVD and starts it and if everything is fine with your set-up and application, it will display following Emulator window −
icon from the tool bar. Android studio installs the app on your AVD and starts it and if everything is fine with your set-up and application, it will display following Emulator window −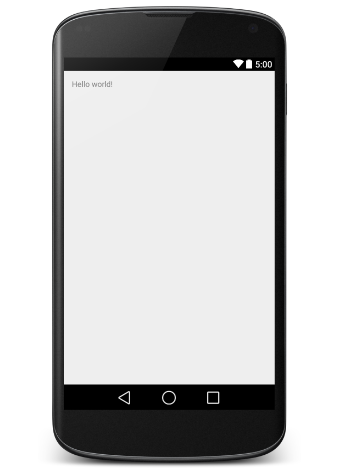
Congratulations!!! you have developed your first Android Application and now just keep following rest of the tutorial step by step to become a great Android Developer. All the very best.
Comments
Post a Comment